|
|
Overview
Enter all of the details for your package(s), then click the Rate button to see the estimated rates for your shipment. Continue below for details about each option.
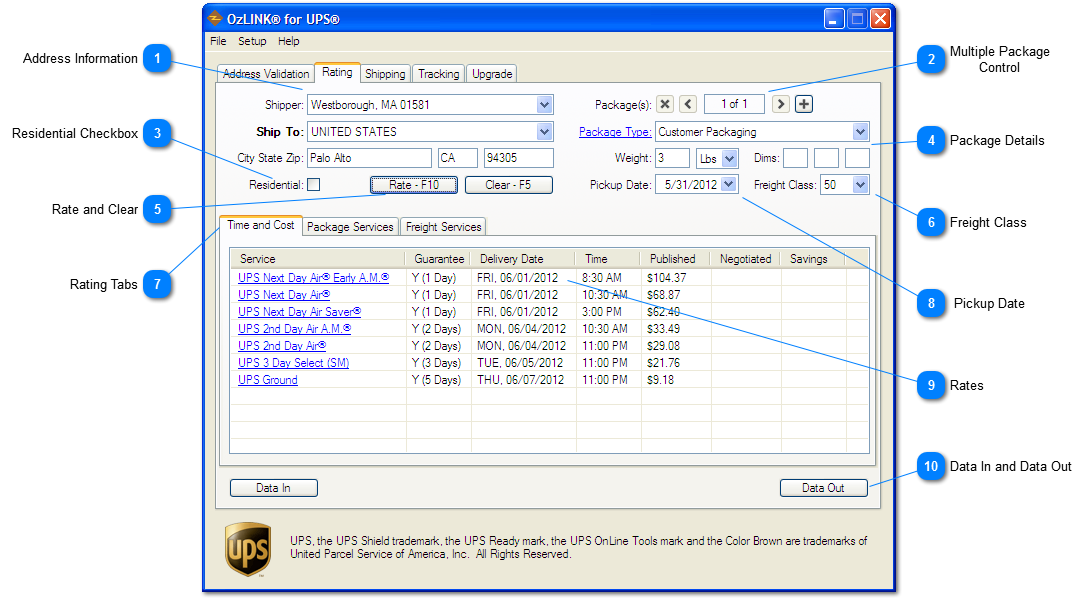
 Address Information
Enter the destination address for this shipment. The shipper address associated with your UPS account is automatically used as the originating address. To change the address that your package is shipping from, open the Shipper dropdown menu and select Edit Ship From.
| |
 Multiple Package Control
NOTE: Multiple package rating is not available in the free edition. See: How to Upgrade
You can group multiple packages into a single shipment by using this multiple package control. First enter the destination shipping address, package weight, dimensions, and service options for your first package. Package services can be customized per package, while freight service options will apply to the entire shipment.
Click the '+' button to add a new package to the shipment. All of the details from the current package will be copied to this new package, including the package services. You can then change the weight, services, and other details for this new package as appropriate.
Once you have more than one package in the shipment you can move between packages with the '<' and '>' buttons. You can only work with a single package at a time. The text in the middle of the controls will tell you the package you are currently working with and the total number of packages in the shipment. For example '2 of 4' would indicate that you are looking at the second package out of four total packages.
Click the 'x' button to remove the current package from the shipment. You cannot remove the last package.
| |
 Residential Checkbox
Check this option if your package is being delivered to a residential address.
NOTE: Shipping to a residential address without checking the residential box in the carrier software could result in penalties from your carrier.
| |
 Package Details
Enter the weight and dimensions of the package being shipped. You can use the dropdown menu next to the weight to change between pounds and kilograms. The dimensions should be listed in inches if your weight is in pounds, and in centimeters if your weight is in kilograms.
You can choose a box from the Package Type dropdown instead of entering the box dimensions if you use standard boxes. For more details see: Set Up Custom Package Types. | |
 Rate and Clear
Press the Rate button or F10 on your keyboard to get the rates from UPS. You must enter at least a destination zip code and a package weight to rate the package. Press Clear or F5 on your keyboard to clear all information and start fresh for a new package.
| |
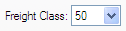
 Freight Class
Choose the appropriate freight class for your shipment. Your UPS representative can tell you more about choosing the correct freight class.
| |
 Rating Tabs
| |
 Pickup Date
Set the pickup date for the shipment. Clicking the dropdown menu will display a calendar to choose the appropriate date.
| |
 Rates
Here you can view the rate for each of the available UPS services. This area will be blank until you click the Rate button. Click any of the blue service names for a detailed breakdown of the costs associated with that service type. If you would like to display your negotiated rates, see: Displaying Rates. To also get rates for freight services, see: Freight Services. For more details about this tab, see Time and Cost. | |
 Data In and Data Out
These buttons can help you move information in and out of OzLINK by improving the basic Cut and Paste functionality built in to Windows.
Data In is an improved paste button that will try to place the pasted information in the correct place. For example, if you copy the text 'Beverly Hills, CA 90210' from another program on your computer and click the Data In button, OzLINK will place the city, state, and zip in the correct place in the rating screen.
Data Out will automatically copy the shipper number, ship to address, weight, number of packages, pickup date, and any rate estimates that are currently on the screen to the clipboard. You can then paste the information into any other program on your computer if you would like to record those details.
| |
|
|