|
|
Configuring QuickBooks - Desktop Editions
Overview
To access the desktop QuickBooks configuration menu, click the Setup menu in OzLINK for UPS, then click Shipping. Choose QuickBooks Pro, Premier, or Enterprise from the Customer Data menu. Click Configure Business Rules to set up QuickBooks. See below for more details about each of the setup options.
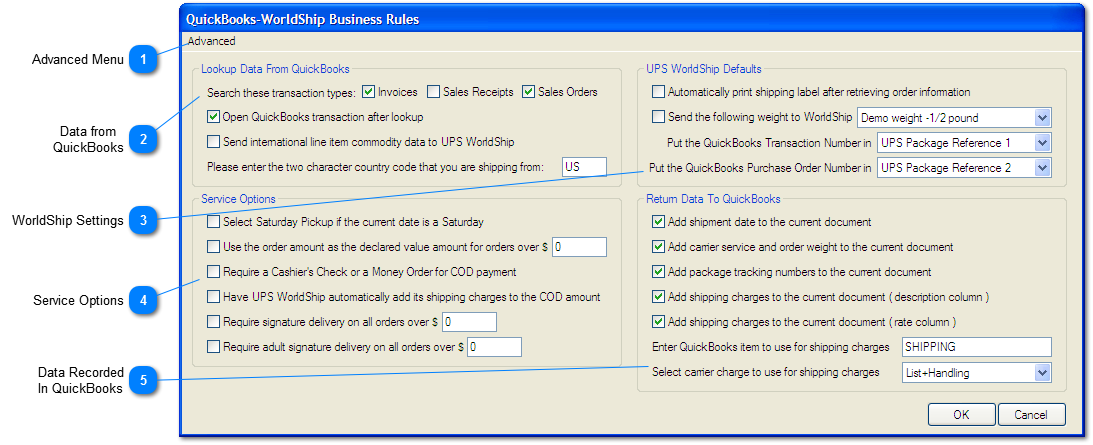
 Advanced Menu
Use this menu to access additional setup options for QuickBooks.
Options include:
| |
 Data from QuickBooks
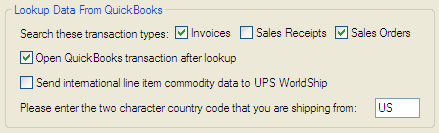
Search these Transaction Types:
Check the transaction types that your company uses when fulfilling a shipment.
Leaving one or more of these transaction types unchecked can speed up your workflow and reduce mistakes in the event that a transaction number is reused. For instance, in QuickBooks it is possible to have an invoice number 1120 and a Sales Receipt number 1120 that belong to two completely different customers. When you use that transaction number in OzLINK, you will be asked to select either the invoice or sales receipt so that the correct information is transferred. If, however, your company only ships with invoices (only 'Invoices' checked off in this section), then OzLINK would use the invoice automatically and ignore the sales receipt. This removes the interrupting dialog box and helps reduce errors.
Suggestion: If overlapping transaction numbers are slowing you down, change your naming conventions to avoid duplicate entries. For example, name your invoices "IN-###" and your sales receipts "SR-###."
Open QuickBooks Transaction:
Check this box to display the transaction in QuickBooks after you enter it in OzLINK. This can be helpful if you are working from a printed page or other information source and would like to confirm some information in QuickBooks before the shipment is completed.
Send International Line Item Data:
Check this box if you would like to move item details from QuickBooks to your carrier software when dealing with international shipments. The information must be present on the transaction that OzLINK is currently processing. If this box is unchecked, OzLINK will not move these item details and you will have to enter them manually for your international documentation.
Country Code:
OzLINK needs to know which country you are shipping from to function correctly. This determines which shipments are domestic and which are international.
| |
 WorldShip Settings
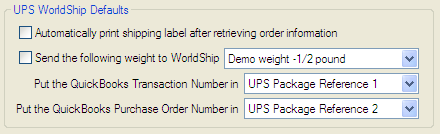
Automatically Print Shipping Label:
Check this box if you would like the shipment to be finalized and processed automatically by OzLINK. This can speed up your shipping process once you are comfortable using OzLINK. OzLINK will move all of the shipment information to UPS WorldShip, and then tell WorldShip process the shipment and print a label.
Send the Following Weight:
OzLINK can fill in the shipment weight in UPS. Options include:
OzLINK Scale is a free utility from Oz Development. Selecting this option will send the OzLINK scale data to UPS WorldShip automatically. For more information and to download the tool, see: http://www.ozdevelopment.com/scale/
NOTE: Place the package on the scale before entering your transaction in OzLINK.
This will send a package weight of 0.5 lbs to UPS. This is most useful during testing.
|
Each time a transaction number is entered in OzLINK, a message box will appear asking for the shipment weight. This is useful if your shipping station is using a scale that isn't attached to the computer, or if the weights of your packages are already known.
|
|
Use this if you do not want OzLINK to worry about sending the weight to UPS WorldShip. This can be useful if you already have your scale set up and working well within WorldShip.
Put the QuickBooks Transaction Number in:
UPS allows up to four carrier references, named "UPS Package Reference" 1 through 4. Use the dropdown menus to set which reference field should hold the transaction number.
Put the QuickBooks Purchase Order Number in:
UPS allows up to four carrier references, named "UPS Package Reference" 1 through 4. Use the dropdown menus to set which reference field should hold the purchase order number. You can leave this section blank if you do not want to include the PO number.
| |
 Service Options
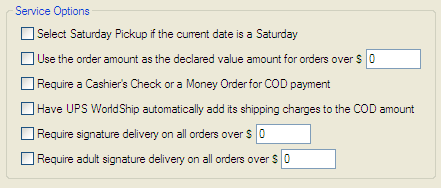
Select Saturday Pickup:
If this box is checked, and you are shipping a package on a Saturday, this will request a Saturday carrier pickup from your facility. If this box is not checked, Saturday Pickup Service will not be automatically selected in the carrier software. You could still select it manually in the carrier software if you would like to handle Saturday Pickups on a case-by-case basis.
Use the Order Amount as the Declared Value Amount:
Enter a value here to insure shipments over a certain value. Shipments under this value will not be insured. Set to zero to never insure packages.
NOTE: If a shipment has multiple packages, only the first package will be insured.
Require a Cashier's Check or Money Order for COD:
Check this box to require a Cashier's Check or Money Order. Leave it unchecked to accept all forms of payment that UPS can process.
Have UPS WorldShip automatically add shipping charges to COD:
Checking this box will automatically add the shipping charges to the total charge. The recipient will pay for the shipping and the goods at the time of delivery.
Require Signature:
Set a value threshold for signature requirements. Shipments with a value over this setting will require a signature. Shipments with a value less than or equal to this setting will not require a signature.
Require Adult Signature:
Set a value threshold for adult signature requirements. Shipments with a value over this setting will require an adult signature. Shipments with a value less than or equal to this setting will not require an adult signature.
| |
 Data Recorded In QuickBooks
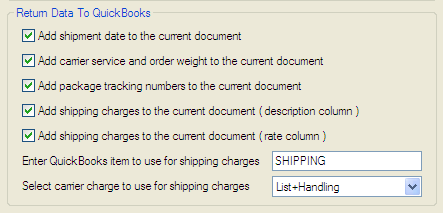
Shipment Information Added to QuickBooks:
This section allows you to choose the information that will be added to your QuickBooks transaction once shipping is complete. OzLINK will create a single line item in the transaction to hold all of the checked information. For most of the checkboxes, the information will be written in the description column of the line. In the case of "Add shipping charges to the current document (rate column)," the shipping charge will be written in the 'rate' column of the transaction, and will impact the final price on the transaction.
Example line from a QuickBooks invoice, with all options checked and item name "SHIPPING":
Enter QuickBooks Item to use for Shipping Charges:
This is the name that will be used when creating a new line in your QuickBooks document. The item must already exist in QuickBooks.
Select Carrier Charge to use for Shipping Charges:
This option determines the actual number that is used for shipping charges. Options include:
This will put the normal list price in the QuickBooks transaction. This is usually used if you do not have negotiated rates with your carrier or if you'd like to charge the full shipping price to your customer.
This will use the normal list price, as above, and add any handling charges that you have defined in UPS WorldShip. The rate will show up as a single cost for shipping in your transaction and will not mention handling. (NOTE: this section refers ONLY to handling charges set up in WorldShip, not those set up in the OzLINK handling section. Generally it is best to configure handling in your carrier or in OzLINK, but not in both.)
This will put the negotiated shipping price in the QuickBooks transaction. Negotiated shipping prices are reduced prices that some companies receive from UPS. This option is usually used to pass on savings to your customer. You must first activate and download your negotiated rates in UPS WorldShip if you would like to use this option.
This will use the negotiated price, as above, and add any handling charges that you have defined in UPS WorldShip. The rate will show up as a single cost for shipping in your transaction and will not mention handling. (NOTE: this section refers ONLY to handling charges set up in the carrier, not those set up in the OzLINK handling section. Generally it is best to configure handling in your carrier or in OzLINK, but not in both). You must first activate and download your negotiated rates in UPS WorldShip if you would like to use this option.
| |
|
|