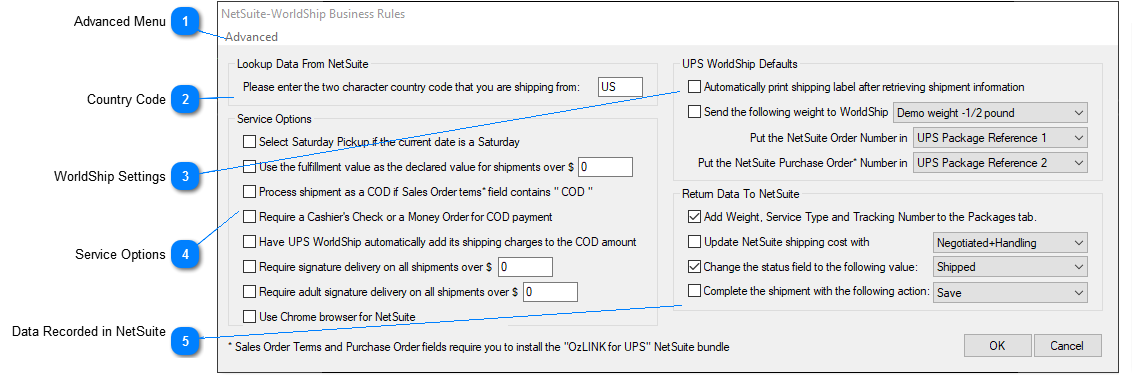
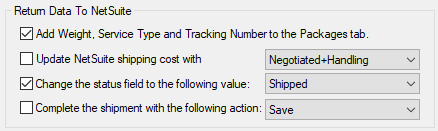
Data Recorded in NetSuite
Add Weight, Service Type and Tracking Number to the Packages tab:
Check this box to automatically record the listed details in the packages tab in the NetSuite fulfillment.
Update NetSuite shipping cost with:
This option determines the actual number that is used for shipping charges. Options include:
This will record the normal list price in NetSuite. This is usually used if you do not have negotiated rates with your carrier or if you'd like to charge the full shipping price to your customer.
This will use the normal list price, as above, and add any handling charges that you have defined in UPS WorldShip. The rate will show up as a single cost for shipping in your transaction and will not mention handling. (NOTE: this section refers ONLY to handling charges set up in WorldShip, not those set up in the OzLINK handling section. Generally it is best to configure handling in your carrier or in OzLINK, but not in both.)
This will record the negotiated shipping price in NetSuite. Negotiated shipping prices are reduced prices that some companies receive from UPS. This option is usually used to pass on savings to your customer. You must first activate and download your negotiated rates in UPS WorldShip if you would like to use this option.
This will use the negotiated price, as above, and add any handling charges that you have defined in UPS WorldShip. The rate will show up as a single cost for shipping in your transaction and will not mention handling. (NOTE: this section refers ONLY to handling charges set up in the carrier, not those set up in the OzLINK handling section. Generally it is best to configure handling in your carrier or in OzLINK, but not in both). You must first activate and download your negotiated rates in UPS WorldShip if you would like to use this option.
Change the status field to the following value:
OzLINK can automatically update the status field in your fulfillment once it has finished processing. Check the box to enable the update, then select the value that you would like to use.
Options include:
Complete the shipment with the following action:
OzLINK can automatically save your fulfillment after it has been processed. Check the box to enable saving, then select the option that you would like to use when saving.
Options include:
-
Save
-
SaveAndBill
-
SaveAndPrint
|