Overview
OzLINK can integrate with NetSuite, allowing you to move information between NetSuite and your shipping software quickly and easily. Before actually shipping from NetSuite, you will need to set up the NetSuite connection. Please refer to
Select the Information Source and
Configure NetSuite to set up your connection to NetSuite.
Shipping
-
Once your connection has been set up, click on the Shipping tab in OzLINK for UPS.
-
Using Internet Explorer, open an item fulfillment in NetSuite, then click the Send address to UPS button. OzLINK will move the information from that item fulfillment into your shipping software.
-
Make any necessary changes in your shipping software, then click Process Shipment to print a shipping label. OzLINK will gather details about the shipment and record them in the item fulfillment.
If you would like to change the information that moves between NetSuite and your shipping software, please see:
Configure NetSuite
Toolbar Mode
OzLINK for UPS can operate in Toolbar Mode if you are using NetSuite. To turn on toolbar mode, click on the Shipping tab, then click the blue OzLINK in toolbar mode link.
When OzLINK is in toolbar mode you can use it just like using the standard screen described above. Open an item fulfillment in NetSuite, then click the UPS button to send the shipping details to your shipping software.
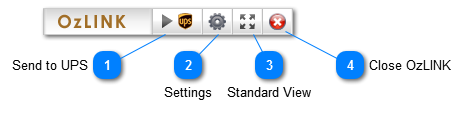
 Send to UPS
Click this button to move the shipping information from an open item fulfillment in NetSuite to your shipping software.
|
|
 Settings
Click this button to view or change the settings for your NetSuite connection.
|
|
 Standard View
Click this button to exit toolbar mode and return to the standard OzLINK for UPS screen.
|
|
 Close OzLINK
Click this button to close OzLINK.
|
|