Batch Actions and Workflow
Overview
It's easy to switch a style between address validation, rating, shipping, and tracking. You can also adjust the workflow associated with each style. To change these settings, first make sure the correct style is selected by clicking on the
Styles button in Excel. Once you have confirmed that the correct style has been selected, click on the
Setup button in Excel to open the style setup screen. (
Where are the style and setup buttons?)
Transaction Types
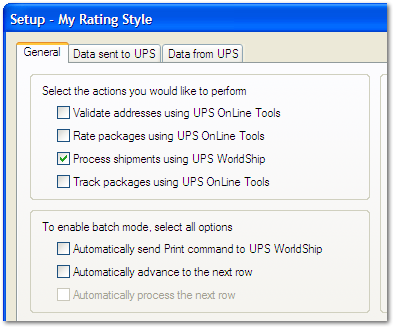
On the General tab of the style setup screen, check the transaction that you would like to use. Options include:
You provide an address to check. UPS will tell you if the address is valid and will provide a possible suggestion to correct the address.
You provide information for a possible shipment. UPS will tell you how much that shipment will cost, how long it will take, and various other pieces of information about the shipment.
You provide information for an actual shipment you would like to complete right now. UPS will process the shipment and give you a tracking number, the cost, and various other pieces of information.
You provide a UPS tracking number for a package you would like to track. UPS will tell you the status of the shipment, give you proof of delivery information if it has already been delivered, and more.
Automatic Processing
These options will change your workflow. On the General tab of the style setup screen, check the batch mode options that you would like to use. Options include:
This option is only available if you have chosen 'Process shipments' as the transaction type for this style. When checked, shipment information in the spreadsheet will be sent to UPS WorldShip and automatically processed. You will receive a label for your packages and be charged for the shipments, just as if you had typed all of the information into WorldShip manually.
Normally OzLINK will process information on the currently selected row in Excel. Check this option if you would like the Excel selection to move down one row after processing. This would allow you just click the "Send to UPS" button multiple times to process subsequent rows, rather than needing to select a new row every time.
This option is only available if you have chosen "Automatically advance to next row" above. Check this option if you would like OzLINK to process every row in the spreadsheet with a single button click. When you click "Send to UPS" OzLINK will start processing at the currently selected row, and will continue to process each lower row until it encounters an empty row. This can be particularly helpful when you do not need to examine every transaction as it is completed, such as when you are tracking many packages or validating a set of addresses.
Related Pages